[Chef] Chef Server install
1. Chef Server install
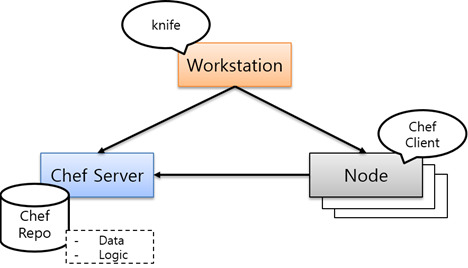
Chef는 Server & Client 모델을 따르는 프레임워크로 Chef Server, Workstations, Node로 구성된다.
Chef는 인프라 정보를 코드화 할 수 있다는 점을 착안해서 만든 인프라 관리소프트웨어이다. Chef는 인프라를 구성하는 데이터들을 변수에 저장, 프로비저닝 및 설치하는 과정을 코드화 해서 관리한다. 코드화를 하는 이유는 프로그램을 이용해서 데이터를 관리하는 이유와 동일하다.
Chef를 이용하면, 인프라의 자동화를 위해서 필요한 정보를 recipe라는 재사용 가능한 코드로 정의할 수 있다. recipe는 리소스라는 블록으로 만들어진다. 리소스는 유저관리, 파일, 템플릿, 패키지 설치와 같은 인프라를 관리하기 위해서 필요한 기능들의 모음이다. Chef에는 유용한 많은 수의 리소스가 존재하며, 사용자가 자신만의 리소스를 만들어 사용할 수도 있다.
Chef Server 설치 방법은 Standalone, High availability, Tiered 세 가지가 존재하지만, 본 포스팅에서는 Standalone 설치 방법으로 진행한다.
1.1. Chef Server Install
Chef Server를 설치하기 전, package update 수행을 통해 플랫폼이 요구 사항과 완벽하게 호환되어 있는지 확인한다.
[root@ChefServer] $ apt-get update
[root@ChefServer] $ apt-get upgrade- hostname 설정
- vi 에디터를 통해 “ChefServer IP”로 변경
[root@ChefServer] $ vi /etc/hostname
172.16.1.200

:wq

[root@ChefServer] $ vi /etc/hosts
127.0.1.1          172.16.1.200

:wq
// 변경된 hostname을 시스템에 적용
[root@ChefServer] $ /etc/init.d/hostname.sh start
- NTP(Network Time Protocol) 패키지 설치
[root@ChefServer] $ apt-get install ntp- Chef Install
- apt 소스 리스트 변경 후 진행
[root@ChefServer] $ vi /etc/apt/sources.list
# 기존 내용 모두 주석처리 후 하단 정보 추가
deb http://ftp.kaist.ac.kr/debian/ wheezy main contrib non-free
deb-src http://ftp.kaist.ac.kr/debian/ wheezy main contrib non-free
deb http://ftp.daum.net/debian/ wheezy main contrib non-free
deb-src http://ftp.daum.net/debian/ wheezy main contrib non-free

:wq
[root@ChefServer] $ apt-get update
…
Reading package lists... Done
[root@ChefServer] $ apt-get install chef- Chef Server 패키지 다운로드 및 설치
// Chef server 11.0.8 패키지 다운로드
[root@ChefServer] $ wget https://web-dl.packagecloud.io/chef/stable/packages/ubuntu
/natty/chef-server_11.0.8-1.ubuntu.11.04_amd64.deb

//Chef Server 패키지 설치
[root@ChefServer] $ sudo dpkg -i chef-server_11.0.8-1.ubuntu.11.04_amd64.deb
Thank you fo(Reading database ... 133126 files and directories currently installed.)
Preparing to replace chef-server 11.0.8-1.ubuntu.11.04 (using chef-server_11.0.8-1.ubuntu.11.04_amd64.deb) ...
Unpacking replacement chef-server ...
Setting up chef-server (11.0.8-1.ubuntu.11.04) ... …
installing Chef Server!

The next step in the install process is to run:

sudo chef-server-ctl reconfigure
1.2. Chef Server Configuration
- Chef server 서비스 재설정
[root@ChefServer] $ chef-server-ctl reconfigure
Starting Chef Client, version 11.4.0
Compiling Cookbooks...
Recipe: chef-server::default
…
Chef Client finished, 1 resources updated
chef-server Reconfigured!- API 동작 테스트 및 상태 확인
[root@ChefServer] $ chef-server-ctl test
Configuring logging...
Creating platform...
Starting Pedant Run: 2015-06-11 14:37:53 UTC
setting up rspec config for #<Pedant::OpenSourcePlatform:0x00000003b6bd88>
Configuring RSpec for Open-Source Tests
…
Finished in 1.31 seconds
0 examples, 0 failures

[root@ChefServer] $ chef-server-ctl status
run: bookshelf: (pid 2771) 2477s; run: log: (pid 2769) 2477s
run: chef-expander: (pid 2772) 2477s; run: log: (pid 2768) 2477s
run: chef-server-webui: (pid 2777) 2476s; run: log: (pid 2764) 2477s
run: chef-solr: (pid 2855) 2475s; run: log: (pid 2767) 2477s
run: erchef: (pid 2775) 2476s; run: log: (pid 2770) 2477s
run: nginx: (pid 4837) 1s; run: log: (pid 2763) 2477s
run: postgresql: (pid 2794) 2476s; run: log: (pid 2766) 2477s
run: rabbitmq: (pid 2780) 2476s; run: log: (pid 2765) 2477s- FQDN 할당 및 사용
- server_name은 “ChefServer IP”로 설정
[root@ChefServer] $ vi /etc/chef-server/chef-server.rb
server_name = "172.16.1.200"
api_fqdn server_name

nginx['url'] = "https://#{server_name}"
nginx['server_name'] = server_name
lb['fqdn'] = server_name
bookshelf['vip'] = server_name

:wq

//chef-server-ctl reconfigure 재실행
[root@ChefServer] $ chef-server-ctl reconfigure
Starting Chef Client, version 11.4.0
…
Chef Client finished, 2 resources updated
chef-server Reconfigured!- 인증서 파일을 홈 디렉터리로 복사
[root@ChefServer] $ mkdir ~/.chef
[root@ChefServer] $ cp /etc/chef-server/chef-validator.pem ~/.chef/validation.pem
[root@ChefServer] $ cp /etc/chef-server/admin.pem ~/.chef/admin.pem- Knife Configure 실행 및 초기화
[root@ChefServer] $ knife configure
WARNING: No knife configuration file found
Where should I put the config file? [/root/.chef/knife.rb]
Please enter the chef server URL: [http://192.168.1.176:4000] https://172.16.1.200
Please enter an existing username or clientname for the API: [root] admin
Please enter the validation clientname: [chef-validator]
Please enter the location of the validation key: [/etc/chef/validation.pem] ~/.chef/validation.pem
Please enter the path to a chef repository (or leave blank):
….
Configuration file written to /root/.chef/knife.rb- Client List 확인
[root@ChefServer] $ knife client list
chef-validator
chef-webui
1.3. Chef Workstation Setting
knife를 서버에 로그인하지 않으면 사용할 수 없다. 따라서 관리용 작업 환경을 위해 Workstation에서도 knife를 사용할 수 있게 설정해야 한다. knife client create를 실행하면, 에디터로 메타데이터 편집이 필요하기 때문에 EDITOR 환경변수를 설정한다. knife client create 옵션 –a는 admin 권한을 가진 클라이언트의 생성, -f는 서명 파일의 저장소를 지정한다.
[root@ChefServer] $ export EDITOR=vi
[root@ChefServer] $ knife client create ChefWorkstation –a –f ~/.chef/ChefWorkstation.pem
{
  "name": "ChefWorkstation",
  "public_key": null,
  "admin": true,
  "json_class": "Chef::ApiClient",
  "chef_type": "client"
}
:wq

Created client[ChefWorkstation]- Client List 확인
[root@ChefServer] $ knife client list
chef-validator
chef-webui
ChefWorkstation
2. Chef Workstation install
Chef Workstation은 Chef 개발자의 개발 시스템을 일컫는다. Chef Server에 접근할 수 있는 권한을 획득한 뒤, 노드 관리, recipe 개발과 같은 DevOps 업무를 수행하게 된다. 이 작업이 이루어지는 노드를 Workstation이라 한다. Chef 개발자는 Workstation을 통해 형상정보와 코드(cookbook)를 개발 및 테스트하고, chef server에 업로드를 수행한다.
2.1. Chef Install
- Opscode Omnibus Packaging 설치 스크립트를 사용하여 Chef를 설치
[root@ChefWorkstation] $ yum install curl openssl
[root@ChefWorkstation] $ curl -L https://www.opscode.com/chef/install.sh | sudo bash
[root@ChefWorkstation] $ chef-client –v
Chef: 12.3.0- 루비 PATH 추가
[root@ChefWorkstation] $ echo 'export PATH="/opt/chef/embedded/bin:$PATH"' >> ~/.bash_profile && source ~/.bash_profile
[root@ChefWorkstation] $ ruby –v
ruby 2.1.6p336 (2015-04-13 revision 50298) [x86_64-linux]
2.2. Knife Configuration
Knife는 Chef를 제어하기 위한 CLI 기반의 도구이다. Chef Server에서 제공하는REST API를 이용해서 작업이 이루어진다. Workstation에서 knife를 이용하여 Node, Cookbook, Roles, Databags, Envirionments 등 chef의 모든 것을 관리할 수 있다.
Knife는 chef client와 같은 레벨에서 작동한다. 따라서 Chef Server API에 접근하기 위한 설정들이 필요하다. Knife 설정파일은 ~/.chef/knife.rb에 존재한다. knife를 사용하기 위해서는 knife client 인증 절차가 필요하다.
- 인증서 파일 복사
- Chef Server 액세스를 위한 개인키 및 validation 키 복사
[root@ChefServer] $ ssh root@172.16.1.211 "mkdir ~/.chef"
root@172.16.1.211's password:

[root@ChefServer] $ scp ~/.chef/ChefWorkstation.pem root@172.16.1.211:~/.chef/Chef
Workstation.pem
root@172.16.1.211's password:
ChefWorkstation.pem                           100% 1679     1.6KB/s   00:00
# scp ~/.chef/validation.pem root@172.16.1.211:~/.chef/validation.pem
// ChefWorkstation의 패스워드 입력
validation.pem 100% 1675 1.6KB/s 00:00- knife 설정
[root@ChefWorkstation] $ knife configure
WARNING: No knife configuration file found
Where should I put the config file? [/root/.chef/knife.rb]
Please enter the chef server URL: [https://ChefWorkstation.cs1bcloud.internal:443] https://172.16.1.200
Please enter an existing username or clientname for the API: [root] ChefWorkstation
Please enter the validation clientname: [chef-validator]
Please enter the location of the validation key: [/etc/chef-server/chef-validator.pem] ~/.chef/validation.pem
Please enter the path to a chef repository (or leave blank):
…
Configuration file written to /root/.chef/knife.rb- knife client list 확인
[root@ChefWorkstation] $ knife ssl fetch
…
Adding certificate for 192.168.1.176 in /root/.chef/trusted_certs/172_16_1_200.crt

[root@ChefWorkstation] $ knife client list
chef-validator
chef-webui
ChefWorkstation
3. Chef Client Install
Chef Server는 Chef Solo보다 노드 설정이 다소 복잡하다. 노드가 처음 만들어진 상태에서 chef-client를 실행하면, 아직 API Client 권한을 가지고 있지 않기 때문에 Chef Server에 요청을 할 수가 없다. 요청을 위해서는 Client key 파일을 보유하고 있어야 한다. Chef 관리자는 knife를 이용해서 client를 등록하고, 이때 만들어진 client key 파일을 배포할 수 있다. 해당 과정을 Chef Workstation에서 knife bootstrap 명령어를 사용하여 간단하게 설정할 수 있다.
- knife bootstrap을 이용하여 노드를 Chef Server에 등록
[root@ChefWorkstation] $ knife bootstrap 172.16.1.203

Doing old-style registration with the validation key at /root/.chef/validation.pem...
Delete your validation key in order to use your user credentials instead

Connecting to 192.168.1.89
root@192.168.1.89's password:
172.16.1.203 -----> Installing Chef Omnibus (-v 12)
172.16.1.203 downloading https://www.opscode.com/chef/install.sh
172.16.1.203   to file /tmp/install.sh.8017/install.sh
…
172.16.1.203 Starting Chef Client, version 12.4.1
172.16.1.203 Creating a new client identity for ChefClient using the validator key.
172.16.1.203 resolving cookbooks for run list: []
172.16.1.203 Synchronizing Cookbooks:
172.16.1.203 Compiling Cookbooks...
172.16.1.203 [2015-07-23T17:51:06+09:00] WARN: Node ChefClient has an empty run list.
172.16.1.203 Converging 0 resources
172.16.1.203
172.16.1.203 Running handlers:
172.16.1.203 Running handlers complete
172.16.1.203 Chef Client finished, 0/0 resources updated in 2.040357 seconds
knife bootstrap 명령어를 사용하면 새롭게 가동한 호스트(아직 Chef밖에 설치되지 않은 호스트 포함)가 Chef Ready가 되고 Chef Server에 등록된다. knife bootstrap은 다음 사항을 한 번에 실행해 준다.
- Chef 설치
- /etc/chef 디렉터리 생성
- chef-validator용 키 복사와 설치
- chef-client의 설정 파일인 client.rb의 설치
- chef-client를 실행하고 Chef Server에 등록
참 고 문 헌
[1] Joinc, “클라우드 오토메이션”, http://www.joinc.co.kr/modules/moniwiki/wiki.php/Site
/cloud/automation, 2015.
[2] Opscode, “CHEF DOCUMENTS”, http://docs.chef.io/, 2015.
[3] MIMUL’S DEVELOPER WORLD, “가상 환경에서 Chef 훅 돌려보기”, http://mimul.com
/pebble/default/2013/11/15/1384511737191.html, 2015.
[4] 이토 나오야, 박상욱, “인프라스트럭처 자동화 프레임워크 Chef Solo 입문”, 제이펍, 2014.
[5] 마티아스 마샬, 최광민, “Chef, 클라우드 서비스 설정관리 자동화 도구”, 에이콘, 2015.